Monday, January 10, 2011

First finishes of the year

Great day yesterday, despite the cold. I figured out how to set up the Treadlin' Bloggers webring, for bloggers who use and/or collect vintage or antique sewing machines. The first sites have been entered, though at the moment two are waiting for their code so they can be activated.

Then it was into the studio. Forget organization, I wanted to create. First project was to finish my painted quilt. I finished a last bit of quilting, then added a tiny binding matching the border, using my Davis VF to sew it on. The binding would have turned out nicely except that in a moment when my brain was turned off (only explanation) I tried to trim up the batting and backing and cut the binding at the corners. We just won't talk about what the corners look like on the back.

The second finish is a quilted purse. This was another of my demo pieces. I kept adding to the quilting, decided I liked it and then had to design the purse to use the piece at the size it happened to be. Fortunately I had more of the black and was able to quilt an additional piece for the back and flap of the purse so I could complete it.

I know I've talked about how these pieces were started before, but a quick recap. I used some random fabrics to set up sandwiches for my demo at our guild's quilt show back in October. I did free motion on my treadle sewing machine, with no particular pattern in mind, just showing people what you can do. I ended up with about a half-dozen similar pieces that I set aside. Some, which showed up better, had light thread on the dark background, some had used a bright pink, which didn't show up as well as I'd hoped.

Later I wanted to try out some multi-line quilting techniques, loosely based on Patsy Thompson's hyper-quilting (she uses stencils and is very precise, mine is more fluid).  I used a very small piece first, added quilting until I was happy, accented with Shiva paint sticks and was pleased with the result. So I started working on the next piece, which I ended up using in the purse. The painted quilt I did a little differently, because I started with just the demo quilting, then worked out the painting and additional quilting together. For that one I used Lumiere paint.

Now its on to the next projects. I have several ideas competing to be next.

 More later.

Sunday, January 9, 2011

Treadlin' Bloggers webring

Calling all bloggers who use and/or collect antique and vintage sewing machines! If your blog focuses mainly on sewing adventures using your collection, or on the hunt, repairing or restoring vintage machines, you're invited to join the Treadlin' Bloggers. Users of treadles, handcranks and vintage e-machines are welcome.

Join here

The link takes you to a page to add your site (your blog) to the ring. Enter the name of your blog,  a brief description and the web address (URL) of your blog. Then give yourself a user name and password so you can log in to make changes to your membership. Be sure to include your name and email so I can let you know if there are any questions and when you are added to the ring.

Then the most important thing, copy the code that creates the "ring" box that goes on your blog, and copy it into your blog. On blogger you do this by clicking on Design in the top right corner, then clicking on "Add a Gadget" at the top of your sidebar. Choose HTML/JavaScript and hit the "+" sign. Don't put anything in the title bar, but copy the code into the Content box. Then hit save.

When I get a submission for a ring, I'll check for the code and approve your blog after I see the code is installed.

More later.

Stuff, stuff and more stuff!

The reorganization continues! How is it that I added 33 linear feet of shelving, added three drawer units, filled all of them up and still have more stuff without a home? Never mind, don't answer!

Yesterday was actually a pretty productive day. I got all the bins of theme fabric resorted, labeled and back on the shelves in the storage room. And all my regular fabric is up on the shelves. I sorted through lots of stuff, got the main room to the point I can work again, got rid of a bunch of nasty cardboard boxes and a big bag full of plain old trash. I also put up some little decorative shelves over the windows (found them cheap at Goodwill) and put some of my decorative pieces on them, freeing more horizontal surfaces.

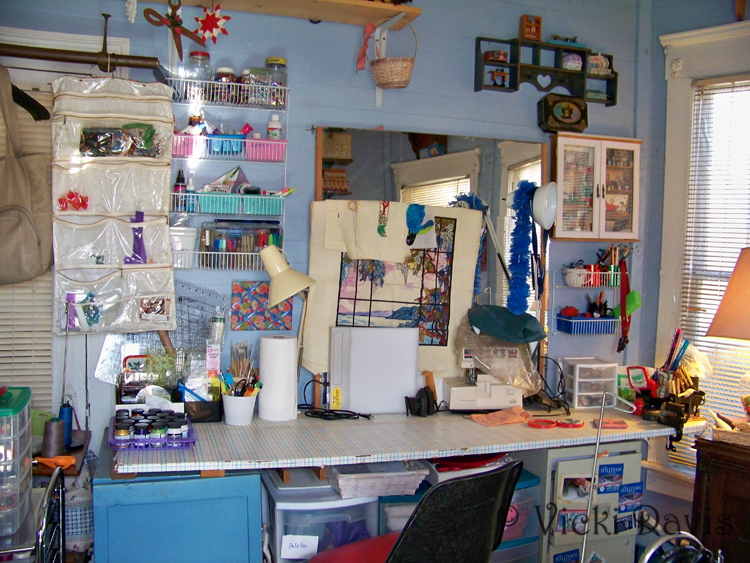
My biggest improvement is my new art station. This counter had been covered with stuff, with no clear space to work. Now many of my art supplies are in the wire shelves on the left end, sewing supplies on the right end, beads, specialty supplies and scraps of fused fabric in the cabinet on the left end and plenty of counter space! There are a couple of long-finished cross-stitch pieces draped over my design board right now, as a reminder that I need to get them framed. The work station is already getting plenty of workout with my fabric painting and the drawing class/challenges I've gotten into.

There's still lots more to do, of course. The table in the annex (dining room) is piled with empty containers, which will replace yet more old nasty cardboard boxes. A lot of the fabric on the shelves needs to be refolded. And I need to go through the dresser drawers in the studio and figure out what needs to be in them (close to the sewing machines) and where to put the stuff I take out. And I have to figure out where to put a Pfaff industrial treadle. That's a big one.

So I'll be fine-tuning for quite a while. Today's project is to vacuum (now that I can get a vacuum in there) and then I'm spending the rest of the day sewing and creating. I'm nearly finished with my little painted quilt, then I have a couple of other projects in progress I'd like to work on.

We're battening down for the weather here. We're expecting a rain/freezing rain mix tonight and tomorrow. A little snow is fun, since we never get more than a little here. But if anyone knows anything good about an ice storm, please let me know.

More later.

Friday, January 7, 2011

Organizing fabric

How should you organize fabric? This comes up on every quilting list at some time or other, and this time of year even more often. The answer it to think about how you use fabric, then set up a system that will support that. There's a million ways (more or less) to organize.

Since I'm in the middle of a major studio reorganization, here's how I organize fabric.

Sorting into piles. This is just part of my stash
First I separate all theme fabric. My themes are Christmas, other holiday, floral, Oriental, 30s repros, Civil War and other period repros, sewing theme, juvenile, cats, other animals, patriotic, general novelty, batiks, beach theme and solids (prints that read as solid). Most of these are in bins in my storage room. Also in bins are all my cut up shirt fabrics, divided by light, medium, and dark/reds. Any fat quarters and small pieces stay with the bins. And another, giant, bin holds extra-wide fabric and large yardage for quilt backs.

The remaining fabric is divided by color, and will live on my new shelves in the studio annex (dining room). Fat quarters and pieces from about one-eighth yard up to three quarters or so are kept together and sorted by color. Since I use them so often, the batiks and beach theme fabrics stay in this room, too.

Neutrals, greens, blues and blacks on their new shelves.
Over the past couple of years, whenever I've brought in new fabric, I've folded it around by ruler, for nice even stacks, so part of my reorganization will be to refold all the rest of the fabric.

Muslin, white on whites and black (Kona) are kept in separate bins, as is fabric that is set aside for a particular project (I try to keep only a few of these kits).

That leaves the little stuff – scraps. When I finish a quilt larger pieces go back into yardage. Smaller ones are divided up. Batiks and specialty fabrics are left as-is and go into one bin for applique and art quilts. The rest of the fabric is cut into strips or squares, in a modified version of Bonnie Hunters Scrap User's System. I keep strips in 1.5, 2, 2.5, 3.5 and 4.5 inch widths, and squares in 1.5, 2, 2.5 and 3.5 inch size. If I finish a quilt and have a lot of odd size squares, I'll put them in a plastic bag, label with size and drop them in with the closest square size. When I get new fabric that doesn't have a specific purpose, I'll frequently cut a couple of strips off of it to add to the bins.

Triangles of any size and bonus or leftover half-square-triangles go in their own bin. Leftover binding goes in another bin. Strings go in their own drawer and crumbs into another. Anything else, slivers of fabric from trimming, thread bunnies, stuff too small or strange to use as a crumb, goes in a big bag. I occasionally rummage through it for things for fabric collage and eventually that stuff is used to stuff pet beds.

I'm excited about getting more of my fabric out where it's easily accessible, and getting each type of fabric together. While my system of sorting hasn't changed, moving some things closer at hand and getting all of each type of fabric together is going to be a big help for me.

If any of these ideas help, let me know!

More later.

Photo Friday

Where ever I go I see things that would make an interesting photograph. But I seldom take the time to stop and get the picture, usually saying "next time." So to encourage myself to spend a little more time looking and taking pictures, I'm going to do a Photo Friday and try to post an interesting picture each week.

This picture was taken last weekend on Tybee Island. This is what I call shell crumbs. At first it just looks like sand, but when you look closely you can see tiny shells, interesting shapes from broken shells and a whole range of colors.

More later.

Wednesday, January 5, 2011

Themes, words and challenges

Anyone thinking about New Year's resolutions? I like the idea many of the members of the QuiltArt list use, choosing a word as theme for the year.

Last year I chose "Dance." First, it was a reminder to be more physically active (I feel so much better when I work out). Second, there was a song a few years ago "I hope you dance." The lyrics include "And when you get the choice to sit it out or dance/ I hope you dance.... I hope you dance."

That's such a great reminder to me to go out and do things I know I will enjoy, and not just sit back in my comfort zone.

I'll keep "Dance" as an overall word, but for my professional and artistic life I chose a set of three words. Focus, Balance and Stretch.

Focus because I often try to multi-task, stopping to check emails, or jumping up to do things around the house. That's one of the drawbacks of working at home. So I need to focus on work, or focus on my art, finish what I need to do, then move on to the other stuff.

Balance because when I get really involved in something I tend to focus on it and forget about other things. So even though I want to focus on several things, I need to balance and not forget the rest.

Stretch because I want to try new things and learn new things in my art, and to remind myself that I need to  make a little more effort to do necessary things that I don't always enjoy.

As a reminder of these ideas, I made a little sign, which I'll post at my desk and in my studio.

And speaking of stretching. I used to love to draw. When I was growing up I was always drawing and was pretty good, though untrained. As an adult I've tended to doodle and recently have started doing Zentangles. Such fun.

So my first stretch of the year is to re-learn the fun of drawing. I signed up a couple of weeks ago for the Sketchbook Challenge. The challenge theme for January is "Highly Prized," and this is my second effort on that theme. I'm sure I'll be doing more versions before the month is over.

And yesterday I heard about an online class called The Art of Silliness, which started today. With a name like that I had to check it out. There's a daily, fun exercise in drawing that you can do in a few minutes (or as long as you want, I guess). I signed up for it and have the first exercise. Registration is still open, if anyone is interested.

Back to fabric. I made more progress on my little painted quilt last night. Now I just need to decide how to finish it. And more progress on the organizing. I pulled out a box of vintage fabric I got a couple of years ago and packed it with the new scraps I got before Christmas, so that's all in one place. And I started sorting through fabric and deciding how I'm going to rearrange it. And I decided to put up shelves on the last section of bare wall in the room. It may look like a warehouse when I'm done, but at least I'll be able to get to things!

More later.


Tuesday, January 4, 2011

Painting, stitching and organizing

More quilting and more painting
I am in love with this paint! After starting off by using the Lumiere to paint the flowers, I decided to add more quilting, then paint more.

The original stitching was an off-white. I stitched around the leaves, feathers and swirls with a light blue green poly, for a nice sheen, then stitched inside the feathers and around the flowers with a pink. Then it was back to the paint. I used the light blue green paint that I had used for the base of the flower petals for the swirls, and used it to accent the darker blue on the feathers. I used a green-gold for the leaves and accented it with the dark blue.

I'm thinking fill in with some dense quilting in a darker color, then a bit more paint as final accents.

One of my goals this year is to experiment more, trying out new ideas and techniques and seeing where they are going. I'm finding it very freeing to work on pieces that don't have a goal other than the process. This one started as one of several to demonstrate free motion quilting during our quilt show.  Since these pieces have served their purpose, I can do whatever I want now, and if I like the way they turn out, it's a bonus.

Work station after removing sewing machine. 
Working on this was my reward after getting back to my organizing efforts. I put up a second set of shelves in the dining room and collected more of the stuff onto them. My new shelves total 24 linear feet and they are almost full already, with more stuff still to put away! Amazing how much was piled on the floor, chairs and on top of the sewing machines in there.

Work station after adding shelves, drawer carts underneath. More still to do
This is going to be a continuing project. My goal is to get like things together, and the things that I use constantly closer at hand. My fabric has outgrown my bin system in the storage room, so will have to be divided, but at least I can have all of a type in one place or the other. It's a nuisance to look through a stack of blues in one place, then another looking for a specific piece.

Speaking of fabric, I was talking to my sister yesterday. She's also working on organizing, and also a fabricaholic. The difference is, she lives closer to sources of fabric and doesn't sew as much as I do. We agreed we both need to go on a fabric diet. No new fabric, unless it is something specifically needed for a current project, until our trip to Mary Jo's in June.

With that in mind, I started a new ticker on the blog, fabric in, fabric out, starting with my purchases on New Year's Day.

Back to organizing. My best progress so far has been creating an art work station. I cleared part of a counter by moving out a sewing machine I seldom use and cleared off a bunch of random stuff. By moving over the wall mirrors, and putting up a little set of wire shelves I made a place for basic art supplies. Under the counter I removed open boxes that I dumped crumbs and strings in, and replaced them with two rolling drawer units. They house crumbs and strings, crumb blocks, solids for postcard backings and palettes and containers for art. On top of the carts are a flat basket with sketchbooks and a divided container with stamps and ink.

The thread stand at the end held all my cotton poly mix threads, for garment making. Since I'm not using it that much, that thread went into my new drawer unit for thread, with additional thread that had been stashed away going in the other drawers. When I'm finished all my thread will be consolidated and I'll free up more space on the work counter.


Well, that's enough for now, so more later.